
To prepare Canva artwork for professional printing, use the exact finished dimensions, switch on Canva’s print bleed, extend backgrounds beyond the trim edge and keep important content safely inside the margins. Use high-quality images, proof every page and export as PDF Print using the colour and crop-mark settings requested by your printer. Canva’s built-in bleed and margin guides are fixed, so specialist products may need a printer-supplied template.
Canva is a useful tool for creating flyers, leaflets and brochures, posters, business cards and other printed materials. However, a design that looks right on screen is not automatically ready for professional production.
At Treetop, we prepare and print everything from short-run marketing materials to larger commercial and large-format projects. We regularly see how small artwork decisions affect the finished result. Missing bleed can leave white edges, text placed too close to the trim can be lost, and low-quality images can become visibly blurred once printed.
The steps below explain how to set up a Canva file correctly and where it is worth checking the specification with your printer before completing the design.
1. Start With the Correct Finished Size
Create the Canva document at the exact size of the finished printed item. Designing at an approximate size and scaling it later can alter image quality, spacing, folds and page proportions.
Before designing, confirm:
- The finished width and height
- Portrait or landscape orientation
- The number of pages, sides or panels
- Whether the item will be folded, bound or shaped
- Whether the printer has supplied a template or cutter guide
Standard Canva templates can be useful, but always compare their dimensions with the printer’s specification. For folded leaflets, presentation folders, labels, packaging or unusual shapes, request a template before placing content. This is much easier than rebuilding the layout after the artwork is complete.
2. Add Bleed Before Finalising the Design
Bleed is the extra artwork that extends beyond the finished edge. It gives the printer a small tolerance when trimming, helping colours and images reach the edge without leaving an unintended white line.
In Canva, switch on the print bleed view and extend every background colour, photograph or graphic that should reach the edge into the bleed area.
- Backgrounds should extend beyond the trim edge
- Full-page photographs should continue into the bleed
- Text, logos and essential details should stay inside the safe area
- Bleed should never be used as a placement guide for important content
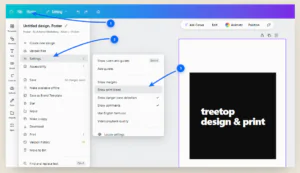
Canva’s built-in bleed and margin settings are fixed and cannot be customised. They may be suitable for many standard products, but they will not automatically meet every printer’s specification. For packaging, shaped items, large-format graphics or any product requiring a specific bleed allowance, ask the printer for a template or setup instructions before completing the design.
3. Keep Important Content Inside a Safe Margin
Bleed protects backgrounds. A safe margin protects the content that must remain visible.
Keep the following comfortably away from trim lines, folds and binding edges:
- Headlines and body copy
- Logos and contact details
- QR codes and website addresses
- Page numbers and legal text
- Borders and essential design features
Canva’s margin guide is a general design aid, not a replacement for a product-specific printer template. Folded, bound or shaped products may need larger or differently positioned safe areas.
4. Use Images and Logos That Can Reproduce Clearly
An image may look acceptable on a phone or laptop and still appear soft when printed. The result depends on the quality of the original file and how large it is used in the design.
- Use original, high-quality files wherever possible
- Avoid screenshots and small images copied from websites
- Do not stretch a small photograph across a large area
- Use the best available version of each logo
- Inspect the exported PDF at a useful zoom before sending it
An image that works on an A5 leaflet may not be suitable for a large-format display or sign. If you are unsure, Treetop’s graphic design and artwork team can review the supplied files and advise whether anything needs replacing, redrawing or adjusting.
5. Set Realistic Expectations for Colour
Screens create colour using light, while printing uses ink or toner on a physical material. Very bright colours can therefore look different in print, and the paper or card selected will also affect the result.
For colour-sensitive work:
- Use consistent brand values throughout the design
- Do not judge colour from a phone screen alone
- Tell the printer when colour accuracy is commercially important
- Provide approved Pantone or brand specifications where available
- Consider a physical proof before approving a large or high-value run
If Canva offers a colour-profile choice on your account, ask your printer whether they want RGB or CMYK output. CMYK export is not available on every Canva plan, and converting a file does not guarantee an exact match to a printed brand colour.
Treetop offers litho and digital printing, including Pantone-matched litho production where appropriate. The right method will depend on quantity, turnaround, finish and colour requirements.
6. Review the Design at Its Finished Size
Check whether the layout still works at the size people will actually see and handle. A flyer must communicate quickly, a brochure needs a logical page sequence, and a poster or banner must remain readable from a distance.
For smaller items, print a basic office proof at 100% scale, provided the design fits your printer. This will not accurately reproduce professional colour or finish, but it can reveal text that is too small, cramped spacing or content placed too close to an edge.
7. Proof the Content Before Exporting
Once a file enters production, even a small correction can cause delays. If an error is noticed after printing, it may also mean wasted materials and the cost of a reprint.
Check:
- Names, dates, prices and offer details
- Telephone numbers, email addresses and website URLs
- Spelling, punctuation and duplicated words
- QR codes and links
- Page order and front/back orientation
- Legal, regulatory or expiry information
Ask someone who did not create the artwork to check it as well. Treetop’s guide to briefing a print design project explains what to confirm before design and production begin.
8. Export the Artwork as PDF Print
When the design is ready, use Canva’s PDF Print option rather than PDF Standard, JPG or PNG. PDF Print is intended for higher-quality output and includes print-related options such as bleed, crop marks and colour-profile selection.
A typical export process is:
- Select Share, then Download
- Choose PDF Print
- Select the correct pages
- Enable crop marks and bleed only if requested by the printer
- Choose the requested colour profile where that option is available
- Download the PDF and inspect every page before sending it
Avoid compressing the file unless the printer has asked you to do so, as compression can reduce image quality. If the PDF is too large to email, use the printer’s upload facility or a secure file-transfer service.
Final Canva Print-Ready Checklist
- The document matches the required finished dimensions
- Orientation, page count and panel order are correct
- Backgrounds extend into the required bleed
- Important content stays inside the correct safe areas
- Images and logos appear sharp at their final size
- Brand colours and proofing requirements have been discussed where needed
- Copy, contact details and QR codes have been checked
- The file has been exported as PDF Print
- The final PDF has been reviewed page by page
These checks help prevent several common print mistakes that can cost businesses money, including incorrect sizing, poor image quality and unsuitable artwork files.
What If the Canva File Is Not Print-Ready?
Not every issue requires starting again. Depending on the file, an artwork team may be able to adjust bleed, reposition content, replace unsuitable images, correct page order or prepare the design for the chosen print process.
Complex folds, shaped products, packaging and tightly controlled colours should still be discussed before the design is complete. Early advice prevents the file being built around dimensions or production assumptions that later need changing.
Treetop’s commercial printing services cover marketing materials, business stationery, packaging, signage and larger commercial campaigns. The team can advise on artwork, paper, finishes and the most suitable production method.
Frequently Asked Questions
Can Canva artwork be professionally printed?
Yes. Canva artwork can be professionally printed when the document uses the correct dimensions, suitable bleed and safe margins, good-quality images and the printer’s preferred PDF settings.
Should I include crop marks and bleed?
Include them only when requested by the printer. Canva’s settings are fixed, so specialist products may need a separate template or different setup instructions.
Should I export the file in RGB or CMYK?
Ask the printer which profile suits their workflow. CMYK export is not available on every Canva plan, and neither profile guarantees an exact printed colour match without the right brand specifications and proofing process.
Send Your Canva Artwork to Treetop
Canva can produce effective artwork, but a professional print result still depends on accurate sizing, suitable images, correct bleed and careful checking. Following the steps above gives your printer a stronger file to work with and reduces the risk of delays or reprints.
If you would like your Canva artwork checked before production, contact Treetop Design and Print. Send the file with the finished size, quantity, deadline and any preferred paper or finishing details, and the team will help take it from screen to print.
Read Our Latest Reviews


speak to a friendly team member today
If you would like a quote, call our team today, email us or fill in the Quick Quote form below, and we will be in touch with you shortly. We look forward to hearing from you.
Contact Us
"*" indicates required fields